|
|
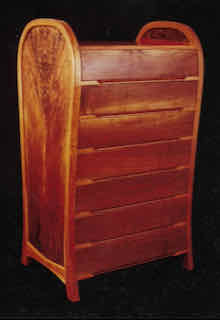
This looks exactly the same in the back as it does in the front, but the drawers only open one way. The frame is Cherry and the panels, drawer fronts
and top are California Walnut. The drawers are hand dovetailed and there are finger pulls routed into the bottom of the fronts. The finish is polyurethane
varnish, painted on. 1981
I can tell that by this time I had learned about making a box for mortising with a router, because the tenons come all the way through the legs here. I didn't
try to do that when I was making mortises with the drill press.
The mortising box was pretty simple. The width of it was as wide as it could be and still have the router base reach a little over each side. It was long enough
to accommodate whatever I wanted to mortise, and it was deep enough that the top of the piece being mortised came below the top edge of the box side. It also had ends.
In the case of the curved chest the box had to be deep enough to account for the curve in the outside of the end piece. Also, in this case, I had to make a flat place
on the inside of the leg for the rail with the tenon to land on. Let's assume that a chest leg is being mortised so I don't have to
keep writing "the piece to be mortised".
With the box made, the next step was to position the leg in the box and lock it in place. I usually had to cut little pieces to put across the bottom of the
box to hold the leg up just below the top of the box side. I marked the mortise out on the leg and wedged it into the box tightly. I used a Makita plunge router with
a square base for this operation, so I put a 1/2 inch mortising bit in the router and put the router, unplugged, on the box. I pushed the bit down so it was just above the
leg adjusted the guide on the router base so that the bit fell where I had the mortise marked out. Then I moved the bit to one end of the marked mortise and screwed a
little block on the outside of the box to serve as a stop for the router base. (That is why the router base extended a bit beyond the outside of the box.).
I did the same thing and attached a stop for the other end of the mortise and then repeated the process of the stops for the other mortise. I set the depth of
cut stop so that the bit would plunge just over half way through the leg.
With the leg looked in the box and the stops set I plugged the router in and made a very shallow test cut. If that was OK I proceeded with the mortise,
plunging down about a half inch at a time and making a pass, then another until I hit the depth stop. When all mortises were cut on that side I turned the leg over
and finished it from the other side.
To do the tenons I cut cross grain all around the rail leaving the tenon itself uncut. Then I cut with the grain on the bandsaw, making the tenon
a little fat so it could be cleaned up with the block plane and a chisel. I made bandsaw cuts the length of the tenons 1/2 inch in from the edge and when the
tenon was in place in the leg and clamped there I drove little wedges into those cuts wedging the tenon against the end grain of the leg. The whole thing,
including the panel, would have been trial fit before gluing, and the panel would be pre-finished so movement in the slot would not reveal unfinished wood.
|
|

